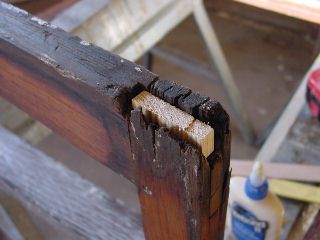
The first step was to cut some wood so that it could be used to fill the bulk of each area to be repaired. I cut some pieces on our antiquated table saw and put them in place. Since I don't have clamps I used a screw to hold the one piece on the corner after gluing it. I could have probably got the wood to be a perfect fit but I am much better with a paint brush than a table saw so it didn't have to be perfect. Bondo would do the rest! Here are the "Before Bondo" pictures.


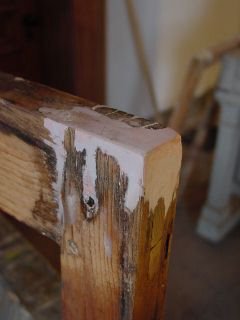
Bondo is a two part epoxy used for auto body repairs. I have used it on numerous occassions to repair woodwork around this place. It hardens very quickly, within 20 minutes and it can be sanded after it hardens. When you mix it, it is quite runny. Not like putty at all. So you have to apply it to your surface in several layers in order to get a smooth finish, sanding between each application. The first application can be quite thick but don't even try to make it smooth. Here is a picture of the rotted edge after the first application of Bondo.

This was then sanded with a palm sander and 100 grit paper. It sands easily and quickly. When it was sanded flush with the wood there were a few dips in the surface and at the edges. A second batch of putty was mixed and applied with a putty knife over the depressions. With each application you need less and less Bondo. The end result was this after 4 applications and sandings.

Once these are painted or faux finished and covered with shellac you would never notice the repair unless you were to strip the window again. How likely is that?
Không có nhận xét nào:
Đăng nhận xét