Todays mission was to get them ready for painting but there is some work involved when you are dealing with wood that looks like this;
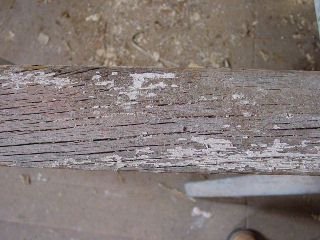
and you have big chunks missing like this.

These are bad, but they are also fixable. First you have to get the wood stripped of paint. I won't go into this process because it has been covered many times on this and other house blogs but if you don't already have one, go and buy a heat gun. Preferably one with a variable temperature dial because wood this bad will catch fire!
Once the paint has been stripped and the glazing putty removed you need to sand the wood. For this project I used a palm sander with 60 grit and then 100 grit paper. One of the windows will have a shellac finish on the inside and so, after sanding, the inward facing surface was rubbed with coarse steel wool and alcohol to loosen any flakes of paint left after the sanding and re-amalgamate any original shellac on the wood (what little remained in this case).
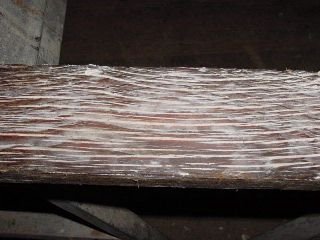
The next stage is the important one. It is also quite simple. Mix some boiled linseed oil with an equal amount of turpentine or paint thinner and brush it over the wood. Where the wood is dry it will suck up the linseed oil like a sponge and may take two or three more applications. When done, let the wood dry over night and repeat the process until no more linseed oil is being absorbed by the wood.
Linseed oil is a hardening oil that leaves a resinous hard coating when it drys. This helps seal the wood and renders it water resistant. It leaves the dull grey colored wood looking like this;

Next you need to fill those shrinkage cracks on the exterior of the window and you don't want to use something that will shrink or crack as the wood expands and contracts with heat or cold. Splits or cracks on the interior will be filled with colored wood putty at a later date when the wood has cured but in the meantime I have filled the the exterior splits and cracks with window glazing putty which will never fully harden and will allow the wood to expand. Since the putty is linseed oil based I went ahead and did this today after the first application of linseed oil to the wood.
I hope this helps some of you out there reading this. It may even save you a ton of money!
This ends todays lesson, except that linseed oil comes from flax seed. Flax is used to make linen. Make sense now, eh?
Không có nhận xét nào:
Đăng nhận xét