We stopped at the infamous "Home Depot" on Monday evening to buy their top of the line Paloma tankless water heater (12 months same as cash AND a $300 tax credit) and enough beadboard to seal the balcony ceiling (hopefully) from any more invasive pigeons!
While wandering around I picked up the "Hampton Bay" ceiling fan catalogue because we need a flush mount outdoor ceiling fan for the aforementioned balcony. Upon reviewing it, I saw THIS!
What is it? A ceiling fan with a built in heater. Neat concept. We have a room on the 2nd floor that might just get one of these in about 2 years when they expand the line and the price drops a bit! At least when they expand the line because this one is a little too modern for our taste!
Thứ Tư, 24 tháng 5, 2006

Thứ Ba, 23 tháng 5, 2006
I Did Not Know That!
If you have received your latest copy of "This Old House Magazine" then you already know this because it was featured as their trivia question. I was surprised to learn that plywood was invented by the ancient Egyptians and patented in the United States in 1865.
Here are the papers to prove it!


It wasn't until 1934 when waterproof adhesives were developed that the invention really took off. I know that plywood began to appear in furniture in the 1930s. Much of the depression era and waterfall styles of the 30s were constructed from plywood. So I was amazed to see that the stuff was around 70 years before. Who'd-a-thunk-it? Maybe I should show this to people on the Landmark Commission.........
Here are the papers to prove it!
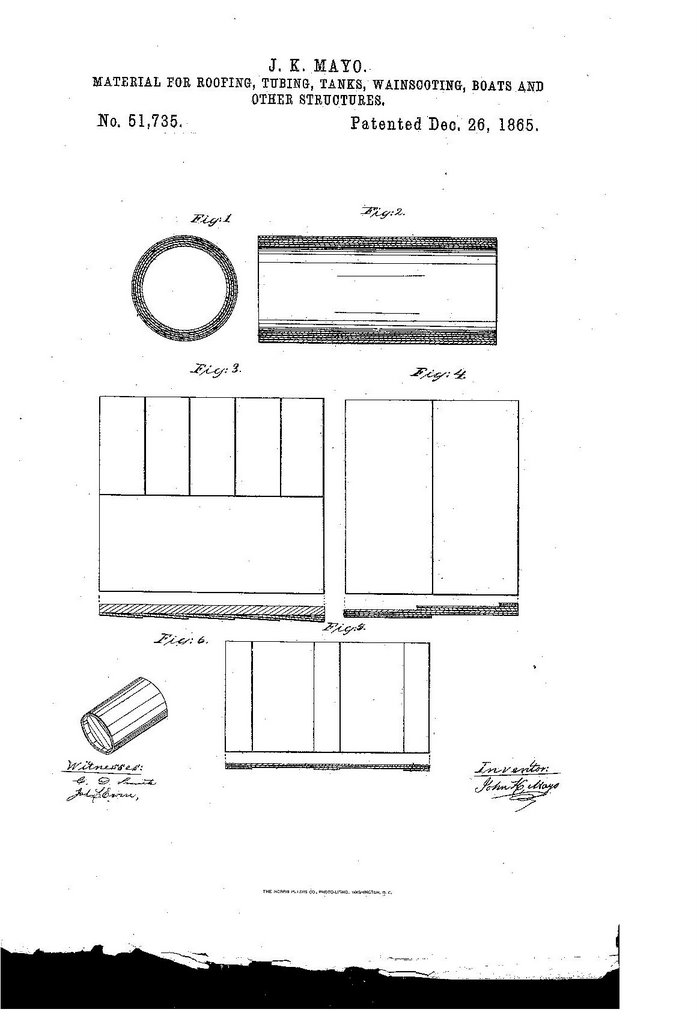

It wasn't until 1934 when waterproof adhesives were developed that the invention really took off. I know that plywood began to appear in furniture in the 1930s. Much of the depression era and waterfall styles of the 30s were constructed from plywood. So I was amazed to see that the stuff was around 70 years before. Who'd-a-thunk-it? Maybe I should show this to people on the Landmark Commission.........
Thứ Tư, 17 tháng 5, 2006
Ask and You Shall Receive!
I have been asked for an update on the progress at the "Old Crackhouse". This was not the first request. Some people don't have the computer skills to spend two hours going through 1 year of "Blog" entries and the "Website" documenting the 5 years of progress on this place. I have been asked to do a summary to make quick viewing of the rooms we have done work on. So, before I give you the link, know this;
This place effectively has 11 rooms. They consist of 2 living rooms, 2 dining rooms, 1 parlor, 1 kitchen, 1 huge bathroom and 4 bedrooms. There is also a large entry hall or "vestibule", two powder rooms, a laundry room, Elizabeth's closet room, the entire third floor which will have a kitchen, bathroom, living room and studio/ work room and there are 5 rooms in the basement that will become 4 rooms when I remove a beadboard partition.
Besides replacing the shingle roof I have completely rewired the place and re-plumbed it. The first floor of the main house is almost finished. I hope to have the parlor primed and the floor sanded this month. This is the last room on the first floor to have the floor finished.
Once done, I have to work on getting a toilet installed on the first floor, getting a laundry room functional on the second floor of the "cottage side", a tankless hot water heater put in the basement and a 90% efficient furnace put in the basement and several of the chimneys lined so that we have some heat if we move in.
Once in, I have the second floor of the "cottage" side to work on and the entire third floor which will require a whole different heating system. Then there is the porch and balcony as well as the front porch and the rebuilding of the small side porch. I have to replace the box gutters and put slate on the mansard part of the roof. Then there is the basement and the garden as well as the garage I have to build..... so this adventure will continue for another two or three years! Sorry, but I have always said it was an ambitious first project! I will say it is certainly alot of work for one person to do (or at least 90% was done by one person) but think of all the money I saved AND some people pay others a whole lot of money to learn the skills that I now have!
The thing that amazes me more than anything else is that I haven't given up yet!
So, for the Quick Tour, go HERE and follow the quick tour links!
This place effectively has 11 rooms. They consist of 2 living rooms, 2 dining rooms, 1 parlor, 1 kitchen, 1 huge bathroom and 4 bedrooms. There is also a large entry hall or "vestibule", two powder rooms, a laundry room, Elizabeth's closet room, the entire third floor which will have a kitchen, bathroom, living room and studio/ work room and there are 5 rooms in the basement that will become 4 rooms when I remove a beadboard partition.
Besides replacing the shingle roof I have completely rewired the place and re-plumbed it. The first floor of the main house is almost finished. I hope to have the parlor primed and the floor sanded this month. This is the last room on the first floor to have the floor finished.
Once done, I have to work on getting a toilet installed on the first floor, getting a laundry room functional on the second floor of the "cottage side", a tankless hot water heater put in the basement and a 90% efficient furnace put in the basement and several of the chimneys lined so that we have some heat if we move in.
Once in, I have the second floor of the "cottage" side to work on and the entire third floor which will require a whole different heating system. Then there is the porch and balcony as well as the front porch and the rebuilding of the small side porch. I have to replace the box gutters and put slate on the mansard part of the roof. Then there is the basement and the garden as well as the garage I have to build..... so this adventure will continue for another two or three years! Sorry, but I have always said it was an ambitious first project! I will say it is certainly alot of work for one person to do (or at least 90% was done by one person) but think of all the money I saved AND some people pay others a whole lot of money to learn the skills that I now have!
The thing that amazes me more than anything else is that I haven't given up yet!
So, for the Quick Tour, go HERE and follow the quick tour links!
Thứ Hai, 15 tháng 5, 2006
Everything you needed to know about Plaster
Now that I know that plaster is basically slaked lime, gypsum and sand, and that I can repair stucco fairly rapidly, I have been doing some research because eventually I would like to finish some of the rooms in the basement. I read somewhere that basement walls in old houses were plastered to stop moisture from passing up to the upper floors. Lime plaster absorbs moisture it seems.
Today I was applying a 3rd coat of joint compound on my parlor walls to smooth them so that I can finish them up later in the week with a thin application of "topcoat". While I was doing this I got to pondering on the ingredients of the stuff. Well, HERE they are in case you just had to know.
Then I found THIS information. If you are hell bent on destroying plaster walls because they are cracked, you should read it. Then there is THIS site to read for additional information.
I do what is practical since I always find that there are several ways to do the same thing.
I have noticed that the longer it takes to get this place fixed up the better I get at doing it though!
Today I was applying a 3rd coat of joint compound on my parlor walls to smooth them so that I can finish them up later in the week with a thin application of "topcoat". While I was doing this I got to pondering on the ingredients of the stuff. Well, HERE they are in case you just had to know.
Then I found THIS information. If you are hell bent on destroying plaster walls because they are cracked, you should read it. Then there is THIS site to read for additional information.
I do what is practical since I always find that there are several ways to do the same thing.
I have noticed that the longer it takes to get this place fixed up the better I get at doing it though!
Thứ Bảy, 13 tháng 5, 2006
Preparing for the Inevitable
We have to line several chimneys this year if we want our woodstoves to work. There are a total of 7 chimneys in this place. Some will be lined with flexible stainless steel liners while two of them will be lined with tile liners if I can lower them down without too much hassel. One room that gets a woodstove is the parlor, which is the room I am currently working on.
On Thursday I marked an area on the wall where the stovepipe would enter. I then looked up the chimney and had to move it 4 inches to the right and draw a 7" circle. Being the precise person that I am, I used a coffee can lid (6 1/2 inches) and a carpenters pencil. I then chisled a hole into the brick that would be slightly larger than 7" because I have to make a galvanized steel thimble to line the hole. You can't find a thimble for a 7" hole anywhere only ones for 6" and 8" holes. I would have to make one out of a strip of galvanised sheet metal and seal it good with refractory cement.
I also need to buy black stovepipe for the woodstove. In order to figure out what I would need, I fumbled through my pile of duct fittings removed in previous years and stored in the basement and found some 7" pipe and fittings. I rigged them up on the stove and everything lines up. Maybe I should have done this before putting the hole in the wall!
I also have to brick up the hole that I made where a fireplace used to be. I had to penetrate the wall in order to clean out the debris. I can't brick up the whole thing yet because I plan to feed the liner up this chimney and I need an opening for that. I want to put a cleanout door in this wall to make chimney sweeping more convienient so I have bricked up the lower portion and formed a floor for my cleanout. So here is a picture of the area as of Friday night. There is a piece of 7" pipe in the wall holding the thimble while the cement dries in case you wondered and I used my newly acquired stucco skills to apply a "Brown coat" to the brick work that I have already done.
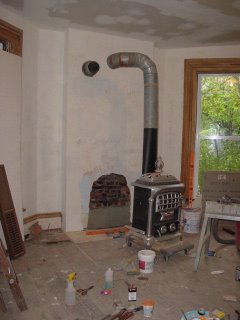
Now if I would just clean up the tools and all the crap I have on floor, maybe I can finish smoothing the walls and get the floor sanded!
On Thursday I marked an area on the wall where the stovepipe would enter. I then looked up the chimney and had to move it 4 inches to the right and draw a 7" circle. Being the precise person that I am, I used a coffee can lid (6 1/2 inches) and a carpenters pencil. I then chisled a hole into the brick that would be slightly larger than 7" because I have to make a galvanized steel thimble to line the hole. You can't find a thimble for a 7" hole anywhere only ones for 6" and 8" holes. I would have to make one out of a strip of galvanised sheet metal and seal it good with refractory cement.
I also need to buy black stovepipe for the woodstove. In order to figure out what I would need, I fumbled through my pile of duct fittings removed in previous years and stored in the basement and found some 7" pipe and fittings. I rigged them up on the stove and everything lines up. Maybe I should have done this before putting the hole in the wall!
I also have to brick up the hole that I made where a fireplace used to be. I had to penetrate the wall in order to clean out the debris. I can't brick up the whole thing yet because I plan to feed the liner up this chimney and I need an opening for that. I want to put a cleanout door in this wall to make chimney sweeping more convienient so I have bricked up the lower portion and formed a floor for my cleanout. So here is a picture of the area as of Friday night. There is a piece of 7" pipe in the wall holding the thimble while the cement dries in case you wondered and I used my newly acquired stucco skills to apply a "Brown coat" to the brick work that I have already done.

Now if I would just clean up the tools and all the crap I have on floor, maybe I can finish smoothing the walls and get the floor sanded!
Thứ Sáu, 12 tháng 5, 2006
50 years ago......
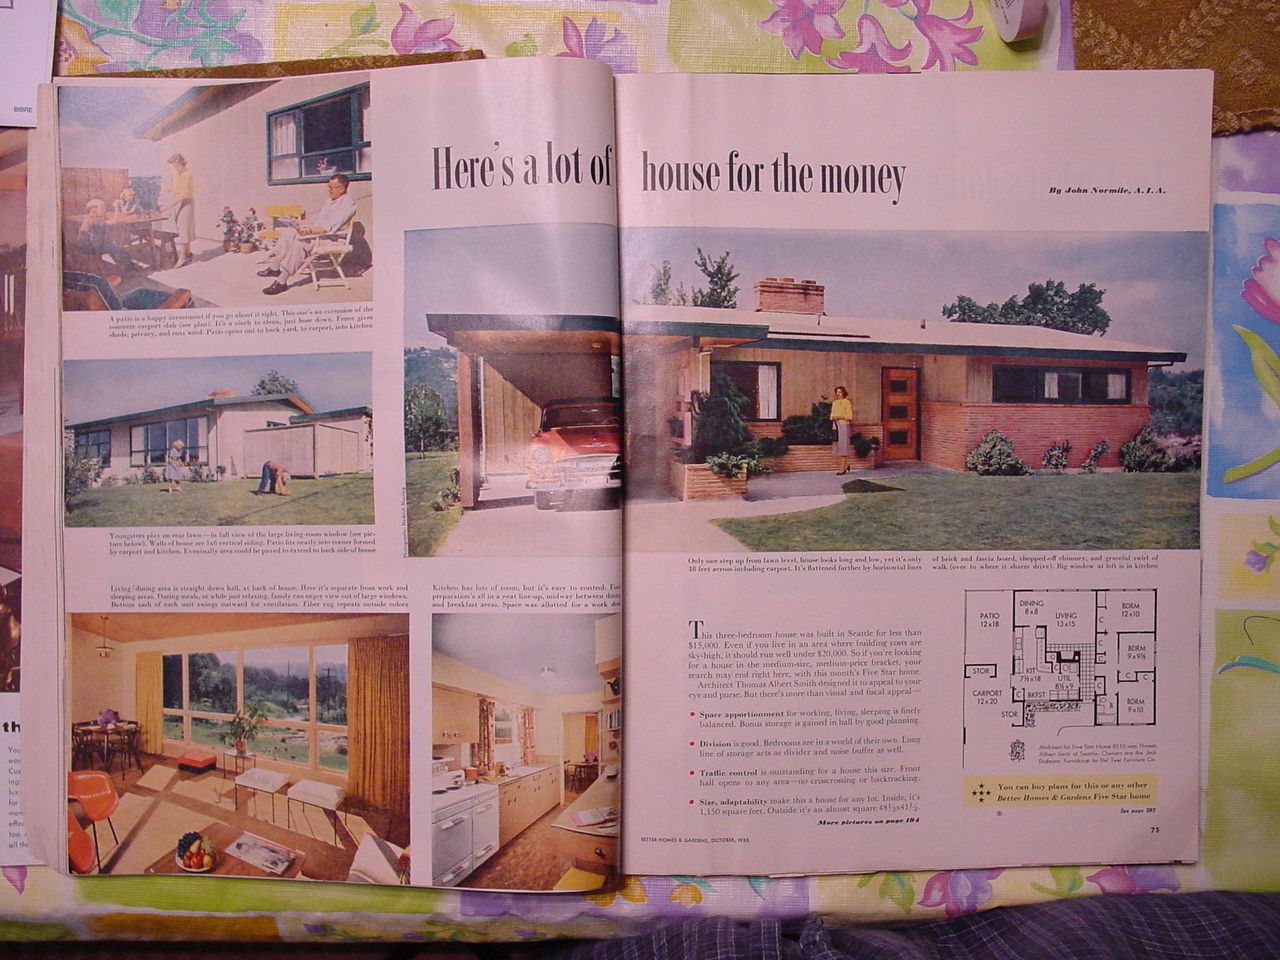
This article from "Better Homes and Gardens" printed in October 1955 says that it cost $15,000 to build this 3 bedroom house in the Seattle area. It also states that it wouldn't cost more than $20,000 to build this in an area where building materials are more costly!
I think everyone should read one of these old magazines. The advertisements certainly provide an evenings entertainment!
Chủ Nhật, 7 tháng 5, 2006
Into the Abyss: Call Your Local Privy Digger!
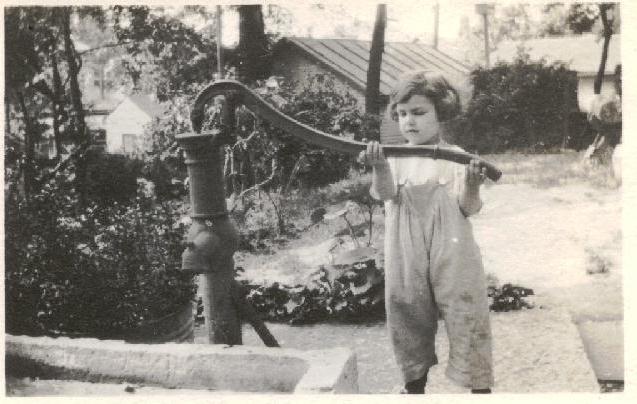
Our house had a well back in 1845 when it was built. We thought we could identify it's location from this photograph taken in 1929.
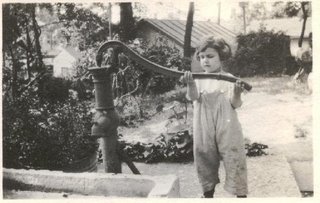
We have a description of the well from 1936; it was described as "hand dug and deep". We also know that there was a limestone trough in front of the pump and that the well supplied many people with potable water after the 1913 flood as it was one of the few wells that had not been condemned by city ordinances.
As the years have passed, the location was revealed when the soil used to fill in the well subsided leaving a deepening hole in the back yard. We have discussed the fact that it would be cool to dig out the well and use it as a source of water for the garden. We could always move the huge limestone slab that covered it back over the hole and attach a pump or we could run a water line from the house to the well an make a faucet to resemble a pump. We could also build an old fashioned brick or stone well with a roof and a bucket and put a cover over the opening. The problem was, you guessed it, digging out the dirt.
We have a guy in the neighborhood who is a "Privy Digger". Basically he is a bottle collector who finds much of his treasure by digging up former outhouse locations. Since bottles were not combustible or biodegradable, they were often thrown into the backyard outhouse hole opening. Some of these cesspits were stone lined and dropped 15 to 30 feet. Some of the older bottles are quite valuable. I had asked our Privy Digger if he would like to investigate our well sometime. He came over on Saturday with a collector of pre 1900s bottles. They probed around the property for our former outhouse location first but found nothing of interest. Right now the back yard is overgrown so much of it is not accessible. As we clear the bushes and weeds he will come back and probe some more.
Reluctantly they decided to dig our well. Within a few feet he was turning out all kinds of jars and bottles, lipstick containers, toothbrushes, batteries, lightbulbs, some plastic items and broken china. After a few hours and about 8 feet down he stopped. The items coming out of the well were likely dumped there around 1945. He did recover a plastic advertising calendar from 1944. Some of the items were interesting enough for him to want to take home but the bulk of it was of little interest to him. He left us with most of the days haul. He was back on Sunday morning with a helper who is new to the hobby and left fewer items for us to admire. Here is what I saw;
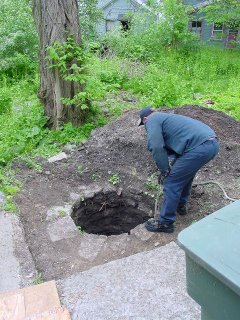

Then I had to go off to work on the old theater building down the street.
If they were able to find as much as they did on Saturday I suspect the new guy was interested in many of the bottles. The bottles are interesting but not valuable or exceptionally old. Many have design patent numbers on the bottom that were issued in the 1930s and are very art deco in design. One Revlon nail polish bottle has a design patent issued in 1936. A tube of Ipana toothpaste was also recovered and based on its design indicates a pre 1947 disposal date. To us, all this stuff is interesting because it adds to the history of the house. To a collector who digs many holes, our well seems quite plain.
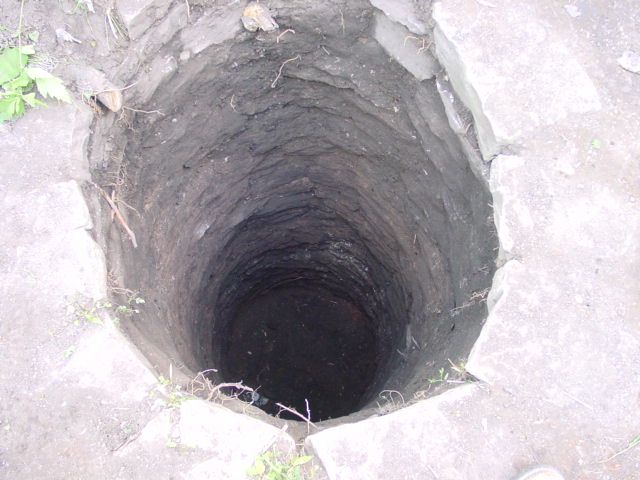
They are down about 15 feet and there is no water yet and at least another 7 feet of debris.
We speculate that at some time between 1929 and 1945 the well was condemned by the city. After that it became the backyard garbage dump. There seem to be layers of ash in it which would have come from the coal furnace and the fireplaces.
What the Privy Digger is hoping to find is an "Early dump". When the well was first used as a garbage pit, he is hoping that they cleaned house and threw all kinds of bottles out. I know he found the top of an 1800s bottle so his interest has been maintained. The thing that helps with our well is that I don't want it filled back in. So he can take his time with the project. I just have to cover the hole with sheets of OSB board. I'm happy he is finding stuff. I certainly didn't expect there to be as much as there actually is.
When I stopped back at the house after working on the theater I took this picture;
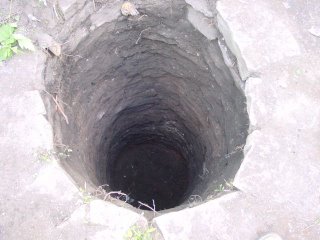
And so that you have an idea of what they are finding, here is a picture of what they left for us;
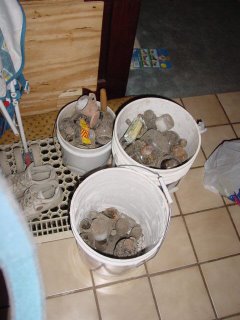
We can clean these up and display them on a shelf in the glass case we have for the parlor. If all this is in our well, I wonder what could be in the privy hole!
We have a description of the well from 1936; it was described as "hand dug and deep". We also know that there was a limestone trough in front of the pump and that the well supplied many people with potable water after the 1913 flood as it was one of the few wells that had not been condemned by city ordinances.
As the years have passed, the location was revealed when the soil used to fill in the well subsided leaving a deepening hole in the back yard. We have discussed the fact that it would be cool to dig out the well and use it as a source of water for the garden. We could always move the huge limestone slab that covered it back over the hole and attach a pump or we could run a water line from the house to the well an make a faucet to resemble a pump. We could also build an old fashioned brick or stone well with a roof and a bucket and put a cover over the opening. The problem was, you guessed it, digging out the dirt.
We have a guy in the neighborhood who is a "Privy Digger". Basically he is a bottle collector who finds much of his treasure by digging up former outhouse locations. Since bottles were not combustible or biodegradable, they were often thrown into the backyard outhouse hole opening. Some of these cesspits were stone lined and dropped 15 to 30 feet. Some of the older bottles are quite valuable. I had asked our Privy Digger if he would like to investigate our well sometime. He came over on Saturday with a collector of pre 1900s bottles. They probed around the property for our former outhouse location first but found nothing of interest. Right now the back yard is overgrown so much of it is not accessible. As we clear the bushes and weeds he will come back and probe some more.
Reluctantly they decided to dig our well. Within a few feet he was turning out all kinds of jars and bottles, lipstick containers, toothbrushes, batteries, lightbulbs, some plastic items and broken china. After a few hours and about 8 feet down he stopped. The items coming out of the well were likely dumped there around 1945. He did recover a plastic advertising calendar from 1944. Some of the items were interesting enough for him to want to take home but the bulk of it was of little interest to him. He left us with most of the days haul. He was back on Sunday morning with a helper who is new to the hobby and left fewer items for us to admire. Here is what I saw;


Then I had to go off to work on the old theater building down the street.
If they were able to find as much as they did on Saturday I suspect the new guy was interested in many of the bottles. The bottles are interesting but not valuable or exceptionally old. Many have design patent numbers on the bottom that were issued in the 1930s and are very art deco in design. One Revlon nail polish bottle has a design patent issued in 1936. A tube of Ipana toothpaste was also recovered and based on its design indicates a pre 1947 disposal date. To us, all this stuff is interesting because it adds to the history of the house. To a collector who digs many holes, our well seems quite plain.
They are down about 15 feet and there is no water yet and at least another 7 feet of debris.
We speculate that at some time between 1929 and 1945 the well was condemned by the city. After that it became the backyard garbage dump. There seem to be layers of ash in it which would have come from the coal furnace and the fireplaces.
What the Privy Digger is hoping to find is an "Early dump". When the well was first used as a garbage pit, he is hoping that they cleaned house and threw all kinds of bottles out. I know he found the top of an 1800s bottle so his interest has been maintained. The thing that helps with our well is that I don't want it filled back in. So he can take his time with the project. I just have to cover the hole with sheets of OSB board. I'm happy he is finding stuff. I certainly didn't expect there to be as much as there actually is.
When I stopped back at the house after working on the theater I took this picture;
And so that you have an idea of what they are finding, here is a picture of what they left for us;
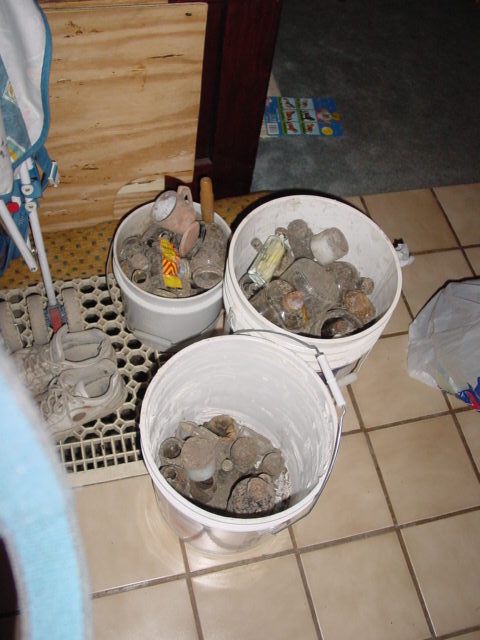
We can clean these up and display them on a shelf in the glass case we have for the parlor. If all this is in our well, I wonder what could be in the privy hole!
Đăng ký:
Bài đăng (Atom)